


+1 (866)-333-0334
Introducing APTUS by TKL Group. This patented system is redefining precast construction in Ontario - connecting columns and walls without propping or grouting.

Vertical elements are no longer on the critical path
The streamlined installation process enables the next level of vertical elements to be erected without any propping before the slab is poured. APTUS elements can be installed as soon as the horizontal formwork is placed.
-
APTUS elements are installed when crane demand is at its lowest
-
APTUS is the only system where vertical elements are installed before the floor is poured
-
Average one-and-a-half-day reduction in typical cycle times using the APTUS system
APTUS Advantages
No grouting
No further work is required after installation and slab pour. Eliminates the risk of structural failure associated with grouting.
No propping
Precast vertical elements are supported by the APTUS couplers requiring no temporary propping.
Safer worksite
Enhances site safety removing congestion and clutter. Removes an entire series of in-situ trades associated with vertical elements - steel fixers, form workers and concreters
Efficient crane usage
Reduction in the number of crane movements & on-site storage requirements. Crane utilisation is optimised by installing elements at a less critical stage of the cycle.

Download the component brochure
Components
The design of the APTUS couplers allows them to be used in a wide range of installation scenarios including square & rectangular columns, blade columns, round columns, walls, façade walls, raking columns and all the possible transitions between. The APTUS couplers are designed to allow for +/- 15mm of vertical tolerance and +/- 3mm of lateral tolerance.

Technical Diagram
1 APTUS Bars
2 Adjustable Coupler
3 Socket Extension
4 Threaded Anchor Head
5 Aptus Starter Bars
-
Straight
-
Hook
-
Cog
-
Anchor Head
Coupler Components
Adjustable Coupler Assembly
Complete coupler assembly consists of a seating stud, an outer coupler, an inner coupler, a threaded stud, and a lock nut.

Threaded Anchor Head
Threaded anchor heads are used to terminate and anchor APTUS bars where no APTUS element continues above. They are also used terminate and anchor APTUS bars at transitions

Socket Extension
APTUS supplies threaded studs in a variety of lengths to suit the slab or beam depth between the APTUS elements. Where the slab or beam depth is larger, socket extensions are used to extend the threaded stud to the required length.

Aptus Bars
Bar (SF)
Socket Each End
Typical APTUS elements use a bar of the required size with a socket friction welded to both ends.

Starter Bar (SF)
Socket One End Only
At transitions where the element size changes or the APTUS bar arrangement changes, APTUS starter bars with a socket on one end are used to change the position and layout of the bars.

Bar (SF)
Socket Each End
Typical APTUS elements use a bar of the required size with a socket friction welded to both ends.

Starter Bar (SM)
Stud One End Only
For transitioning into in-situ elements, a male threaded stud can be supplied friction welded to the end of a straight bar.

Extension Bar (SX)
Socket & Stud Each End
Where required an extension bar can be supplied with a socket friction welded to one end and a threaded stud friction welded to the other end.

Anchor Bar (AM)
Stud One End & Anchor Head
A male APTUS anchor bar has a stud friction welded to one end and an anchor head friction welded to the other end.

Anchor Bar (AF)
Socket One End & Anchor Head
A female APTUS anchor bar has a socket friction welded to one end and an anchor head friction welded to the other end.

Starter Bar (CF)
Socket One End & Cog
APTUS starter bars can be supplied with a socket friction welded to a cogged bar.

Starter Bar (HF)
Socket One End & Hook
APTUS starter bars can be supplied with a socket friction welded to a hook bar.

Ancillary Components
Top and Bottom Shutters
APTUS supplies laser cut steel top and bottom shutters for precast elements to ensure the APTUS bars are cast into the element within the required tolerance. Bottom shutters are supplied to suit the required tappered base of APTUS elements. Shutters can be reused and the number shutters required for a job will be dependent on your production schedule.

Site Templates
APTUS supplies site templates to cast in APTUS starter bars directly to foundations. (Cross arms shown are not supplied with site templates).

Fabrication Anciliaries
Studs and lock nuts to fix APTUS bars to shutters.

Spanners
APTUS can supply required installation tools.


Download the component brochure
Engineers
Designers of APTUS elements can access our online design tool through our partner program which will allow you to quickly and efficiently produce a preliminary design that satisfies the temporary works case and the permanent design case. Become an APTUS Engineering Partner to access software and support.


Temporary Works Design Case
In the temporary works case APTUS elements will cantilever off the element or foundation below requiring no additional propping. The element will be designed with sufficient capacity to resist wind loading as defined for a temporary structure in the applicable local design code.
Permanent Design Case
For the permanent design case APTUS elements are designed in exactly the same manner as an ordinary reinforced concrete column as per the applicable design code. The APTUS couplers provide a full bar break capacity ensuring the reinforcing bar will yield prior to the coupler.
The only difference is an efficient APTUS design will use fewer bars of larger cross sectional area.

Download the component brochure
Fabrication
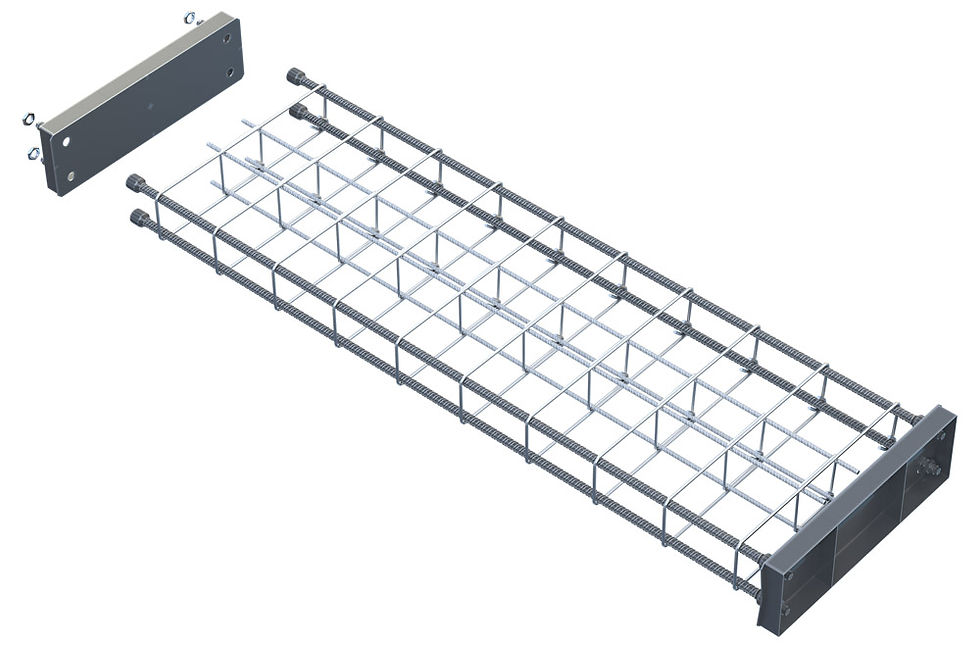
APTUS supplies main vertical bars with friction welded end sockets and laser cut steel shutters to manufacture APTUS precast elements to the required tolerances. Manufacturers who become APTUS partners can access comprehensive training and support to ensure efficient and cost-effective fabrication of precast elements using the APTUS system.
Step 2
-
Always fix the bottom shutter to fabrication jig first, ensuring it is held square and secure
-
Aptus Bars can then be secured to the bottom shutter and conventional reinforcing placed loosely in position
-
Securing the Aptus bars to the bottom shutter first ensures the later fitment of the Outer Couplers is consistent - this provides for a much quicker installation process on site
Step 3
-
The top shutter is then secured to the Aptus Bars and the conventional reinforcement fixed in position
-
There is no jig required to position the top shutter, it is simply held in position by the Aptus Bars
-
Any tolerance adjustment in the Aptus Bars (+/- 5mm) is always taken into account at the top of the precast element - any discrepancy is taken up later through the adjustment provided by the Inner Coupler

Step 4
-
The fabricated reinforcement cage is then placed on the casting bed
-
Industry standard side shuters are simply clamped in position against the top and bottom shutters on the casting bed
-
Standard concrete placement processes are then adopted in accordance with individual precast manufacturer’s QA System

Step 5
-
Following normal post-production procedures, Outer Coupler Assemblies are secured into the bottom of the precast element and Inner Coupler Assemblies are secured into the top of the element
-
Precast Elements are then placed into storage and are now ready for delivery to site

Step 1
-
Aptus Bars, End Shutters & Fabrication Ancillaries supplied by Aptus
-
Aptus End Shutters can be fabricated by precast manufacturers themselves but must strictly adhere to Aptus specifications
-
Conventional reinforcing steel supplied by others


Download the component brochure
Installation
Using the APTUS system eliminates onsite trades associated with vertical elements. Formwork, steel fixing and concreting trades are replaced with a two man install crew. APTUS elements can be installed with no temporary propping required in an average of 7 minutes per element.
Supervision of the installation must be carried out by an APTUS approved installation partner. APTUS can provide a supervisor to work with your crane crew. Alternatively, members of your site crew can become APTUS installation partners to ensure safe installation procedures are followed and all necessary QA documentation is collated.
APTUS installation partners are individuals trained in the safe and correct installation of APTUS elements.
Step 1
-
Inner Couplers 1, 2, & 3 are set to the required RL
-
Inner Coupler 4 (and all other couplers) are wound down to avoid interference
-
Inner Coupler 1 is secured in position with its lock nut

Step 3
-
Outer Coupler 1 is engaged with its Inner Coupler
-
Subject to the vertical alignment required in the first direction, Inner Coupler 2 is rotated left or right to lower or raise the precast element accordingly

Step 4
-
When the required vertical alignment is achieved in the first direction, Outer Coupler 2 is engaged with its Inner Coupler
-
Subject to the vertical alignment required in the second direction, Inner Coupler 3 is rotated left or right to lower or raise the precast element accordingly in that direction

Step 2
-
The precast element is lowered into position and seated onto the three pre-set couplers
-
Note: Coupler 4 is not in position
-
Levelling of the precast element will utilise only three couplers

Step 5
-
When the required vertical alignment is achieved in the second direction, Outer Coupler 3 is engaged with its Inner Coupler
Step 6
-
Inner Coupler 4 (and all other couplers) can now be wound up to engage firmly against the Seating Stud

Step 7
-
Outer Coupler 4 is engaged with its Inner Coupler (as with all other couplers)
-
Crane can be disengaged

Step 8
-
Secure all remaining Lock Nuts

Download the component brochure
Standard Details
Engineering
Manufacturing
Manufacturing
Installation
Brochure
Videos
No props. No delays. No wasted time. Just faster, more efficient construction.

TKL Group is proud to be the official Ontario distributor of APTUS.
Get in touch to learn more about APTUS today.